Are you Health Professional?
Register now, join the community for free access.
GET ALL THE BENEFITS THAT MEDTUBE PLATFORM OFFERS:
- Unlimited access to the largest e-library of professional videos, images, publications, courses
- Connect with peers 450,000+ Healthcare Professionals from 180 countries
- Upload and share your own cases, ask questions and discuss
- Create your professional profile and build personal recognition worldwide
- Stay up-to-date with innovative techniques, treatments, guidelines, discoveries in your fields of interest; be notified
- You are informed about innovative treatments, techniques and innovations in medicine

Craniotomy Tools and Procedures

Case description
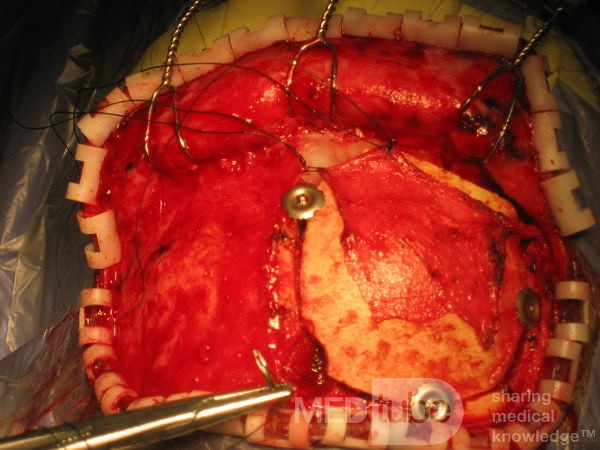
First of all, draw the marking line of the incision on the scalp, so that you can know well when cutting the skin. The scalp needs to be covered with sterile dressing after disinfection to prevent intraoperative pollutants from falling on the scalp. Then local infiltration anesthesia is needed. Then cut the scalp and use a special plastic scalp clip to stop bleeding. Then separate the scalp outside the periosteum, turn it aside and expose the skull. This is a separated flap. It can be seen that the surface of the skull is still covered with a layer of periosteum. Cut the periosteum on the surface of the skull to be opened and turn it to one side. This is an important tool in craniotomy - pneumatic craniotomy drill. Punch a hole in the skull After drilling, extend the high-speed cutter milling cutter into the drilled hole and mill the bone flap. Now it's what it looks like after opening the skull. The brain tissue is closely protected by the dura mater. Further incision of the dura mater can see the brain tissue and complete various surgical operations. Although there are so many steps in craniotomy, there is usually little bleeding. This is a storage tank for recovering blood. After tumor resection, the dura mater will be tightly sutured and the skull will be fixed in situ with titanium clip. Now, even the periosteum is sutured. Finally, remove the scalp clip and suture the scalp.

Other photos of this user

Operation Image of Pancreatic Cancer
Daniel Zhu
views: 2629
Recommended


Medial Clinoidal Meningioma
Nirvana Kalantari
views: 429